
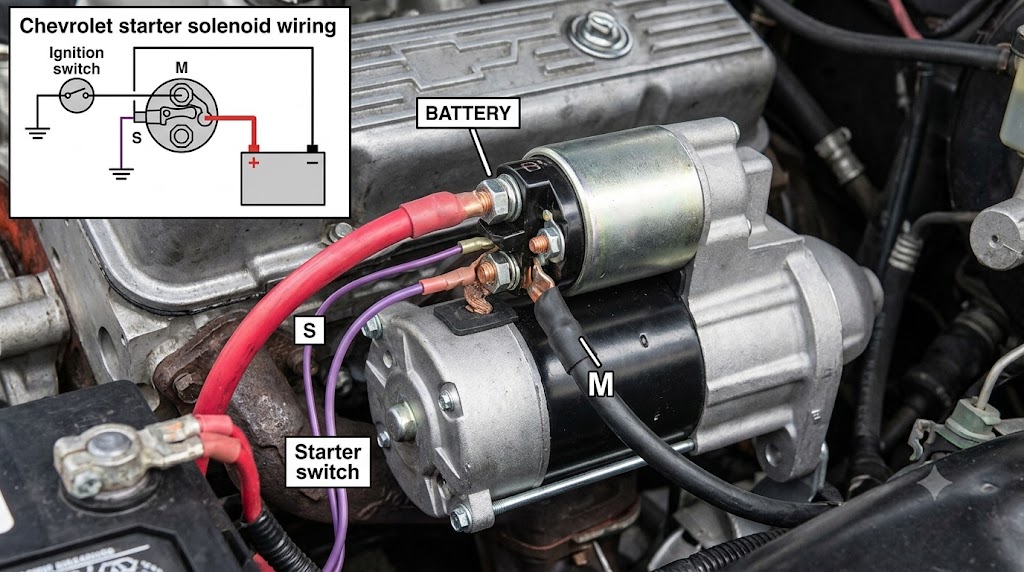
Chevrolet starter solenoid wiring looks simple because only a few terminals are visible, but one incorrect connection can create a no-crank condition, melt a fusible link, damage a control module, or keep the starter engaged after the engine starts. The correct layout depends on the vehicle year, starter design, engine, transmission, and whether the crank command travels directly from the ignition switch or through a relay and engine control module.
This guide explains the complete circuit rather than giving you a misleading one-size-fits-all diagram. You will learn how to identify the battery, motor, S, R, and ground connections; distinguish classic Chevrolet wiring from computer-controlled systems; test voltage drop; and diagnose clicks, slow cranking, or complete silence without replacing good parts.
Safety first: Disconnect the negative battery cable before removing or moving any starter cable. Delco Remy also specifies proper eye protection and recommends leaving work beyond your technical ability to a qualified technician.
Chevrolet Starter Solenoid Wiring at a Glance
The basic Chevrolet starter solenoid wiring layout uses a heavy battery-positive cable on the large B or BAT terminal, a heavy internal strap from the opposite large terminal to the starter motor, and a smaller crank-signal wire on the S terminal. When the S terminal receives the proper start signal, the solenoid moves the starter drive into the ring gear and closes high-current contacts that feed the motor.
Some older starters also have an R terminal, while certain heavy-duty or insulated-ground units have a separate ground stud. Modern Chevrolet vehicles may add a starter relay, an engine control module, a body control module, security authorization, park/neutral logic, clutch-switch logic, and—in some applications—separate control of the starter motor and pinion actuator. GM body-builder documentation identifies applications using both a starter motor relay and a starter pinion actuator relay, which is why a late-model system must not be rewired like a classic small-block Chevrolet.
Quick Terminal Reference
Use the markings molded or stamped into the actual solenoid rather than judging a terminal only by its physical position.
| Terminal | Typical Marking | Normal Connection | Purpose |
|---|---|---|---|
| Battery stud | B, BAT, B+ | Battery positive cable; sometimes alternator feed and vehicle power feeds | Supplies constant battery voltage |
| Motor stud | M or unmarked | Copper strap or lead into starter motor | Feeds high current to motor only during cranking |
| Start terminal | S | Ignition or starter-relay output | Energizes the solenoid coil |
| Auxiliary terminal | R or I | Older ignition-bypass circuit, only when factory-equipped | Provides an auxiliary crank-time output |
| Ground terminal | G, negative stud, or case ground | Engine block or battery-negative path | Completes the solenoid and motor circuit |
Delco Remy’s terminal legend distinguishes the solenoid switch positive, solenoid battery positive, solenoid ground, and starter ground connections. Its passenger-car instructions also state that an existing R-terminal wire should be reconnected to the R terminal on a replacement solenoid rather than moved elsewhere.
How Chevrolet Starter Solenoid Wiring Works
Understanding current flow makes Chevrolet starter solenoid wiring much easier to diagnose. Battery current does not normally travel through the ignition switch to power the starter motor; the motor draws far more current than a dashboard switch can safely carry. Instead, the ignition switch, relay, or control module energizes the solenoid’s lower-current control circuit.
Inside the solenoid, magnetic force pulls a plunger. That movement shifts the pinion toward the flywheel or flexplate and closes a heavy contact disc across the battery and motor studs. The starter then cranks until the start command is removed, after which the return spring opens the contacts and retracts the drive.
Classic Direct-Control Circuit
In classic Chevrolet starter solenoid wiring, the ignition switch sends start voltage through the neutral-safety switch or clutch switch and then to the S terminal. The large battery cable remains hot at all times, while the starter case normally grounds through its mounting surface to the engine block. Resistance in an old ignition switch, bulkhead connector, neutral-safety switch, or long S wire can therefore cause an intermittent or heat-related no-crank condition.
Modern Relay and Module-Controlled Circuit
In modern Chevrolet starter solenoid wiring, turning the key or pressing the start button creates a crank request rather than directly powering the solenoid. The ECM verifies conditions such as theft authorization and transmission range, then operates one or more relays that deliver voltage to the solenoid circuit; GM documentation for several truck and SUV platforms describes separate starter motor and pinion actuator relays.
Identifying Chevrolet Starter Solenoid Wiring Terminals
Before disconnecting anything, photograph the assembly, label every lead, and compare the old starter with the replacement. Delco Remy specifically instructs technicians to identify and tag leads, then reattach them as removed; it also warns that replacement starters can have a different solenoid position from the original unit.
Do not assume the closest small post is automatically S or that both large studs are interchangeable. One large stud is electrically connected to the battery, while the other feeds the motor. Reversing them can place vehicle feeds on a terminal that is only live during cranking or create a direct short through the motor connection.
B or BAT Terminal
In Chevrolet starter solenoid wiring, the B terminal receives the heavy positive cable from the battery. Depending on the vehicle, the same stud may also carry an alternator output lead, fusible-link feeds, or a power-distribution cable, so every original ring terminal must be returned to the correct stud in the correct stack order. On Delco Remy IMS-equipped units, the solenoid battery lead uses a large ring terminal and is positioned closest to the retaining nut.
S Terminal
In Chevrolet starter solenoid wiring, the S terminal is the start-command input. It should receive voltage only while a valid crank command is present, whether that command comes from a classic ignition switch, a remote starter relay, or a module-controlled relay. A permanent jumper from B+ to S will keep the solenoid energized and can damage the starter, pinion, or ring gear.
R or I Terminal
The R terminal appears mainly on older designs and should only be used when the original harness used it. Never move an unidentified wire from R to S simply because both are small terminals; Delco Remy’s replacement instruction is to reconnect an existing R lead to the replacement R terminal. Many later PG260-style starters list no R or I terminal at all.
Motor Terminal
The motor terminal connects the solenoid’s switched output to the starter motor through a copper strap, clip, or short insulated lead. It is not a convenient accessory-power point. Delco Remy passenger-car solenoid instructions show multiple motor-terminal connection styles, while PG260 service instructions specify reinstalling the motor-terminal clip and nut to the stated starter-specific torque.
Ground Path
Most passenger-car Chevrolet starters ground through the starter housing, mounting bolts, engine block, engine ground strap, and battery-negative cable. Some insulated or heavy-duty starters use dedicated solenoid and starter ground terminals; Delco Remy diagrams identify these separately, so a missing ground lead can produce a click with no motor operation even when the positive wiring is correct.
Chevrolet Starter Solenoid Wiring Diagram
The following simplified Chevrolet starter solenoid wiring diagram represents a traditional grounded-case system. It is a functional overview, not a substitute for the factory schematic for your exact VIN.
BATTERY POSITIVE
      |
      | Heavy battery cable
      v
 [ B / BAT STUD ]  Starter-mounted solenoid
        |   |
        |   | Internal high-current contact closes during CRANK
        |   v
        | [ MOTOR STUD ] ----> Starter motor
        |
        +---- Other factory power feeds, only if originally present

Ignition switch / starter relay output
      |
Neutral-safety switch or clutch switch
      |
      v
 [ S TERMINAL ]

Optional older ignition-bypass lead
      |
      v
 [ R TERMINAL ]  Only when factory-equipped

BATTERY NEGATIVE ----> Engine block ----> Starter housing
On a modern vehicle, insert the appropriate control chain ahead of the S circuit: start button or ignition switch, BCM or ECM logic, theft authorization, park/neutral verification, fuse, and starter relay. Some systems use enhanced starters with more than one relay, so applying battery voltage directly to an unknown small terminal is not a valid universal test.
Safe Connection Sequence
For safe Chevrolet starter solenoid wiring, disconnect the negative battery cable, install the starter, attach the original motor strap if service requires it, connect the labeled control lead to S, reconnect any factory R lead only to R, and place the battery and approved distribution leads on B+. Keep ring terminals flat, prevent them from rotating into the case, route cables away from exhaust heat and moving parts, tighten them to the exact service specification, then reconnect the battery negative last.
Chevrolet Starter Solenoid Wiring Differences by Era
Chevrolet starter solenoid wiring changed substantially across decades. Classic 5MT, 10MT, 20MT, and 27MT designs, later PG260 gear-reduction starters, and heavy-duty 28MT through 42MT units do not share one universal terminal arrangement. Delco Remy publishes separate procedures for these families, which confirms why terminal markings and application data matter more than internet photos.
The replacement starter may also clock the solenoid differently, use a blade terminal instead of a stud, omit the R terminal, or include an integrated magnetic switch. Delco Remy notes that some replacement 39MT starters require the flange to be rotated so the solenoid matches the original position, and that the IMS must not be removed from applications designed to use it.
Classic Chevrolet V8 and Inline-Engine Applications
Classic Chevrolet starter solenoid wiring commonly uses a large BAT stud, a small S terminal, and sometimes an R terminal. These vehicles are especially sensitive to corroded bulkhead connectors, heat-soaked solenoids, undersized replacement cables, poor engine grounds, and headers routed too close to the starter. Preserve the neutral-safety or clutch-interlock circuit instead of bypassing it.
Mini and Gear-Reduction Starters
Gear-reduction starters are smaller and often place terminals closer together. A cable lug that fitted the original full-size starter may touch the housing on a mini starter unless it is reoriented and insulated correctly. Some PG260 units have no R or I terminal, so an older vehicle retaining an ignition-bypass circuit may require the correct application-specific solution rather than an improvised jumper.
Late-Model Chevrolet Cars, Trucks, and SUVs
Late-model Chevrolet starter solenoid wiring is part of a networked starting system. A no-crank condition may come from battery state, relay control, transmission-range data, immobilizer authorization, module power or grounds, connector tension, or communication faults—not just the solenoid. Diagnose the crank request and relay command before replacing the starter.
Diagnosing Chevrolet Starter Solenoid Wiring Problems
Start with the symptom, then test the circuit under load. A battery can show acceptable open-circuit voltage yet collapse during cranking, while a corroded cable can pass enough current for lights but not enough for the starter. GM technical material also treats battery condition as a core input when diagnosing starting and charging concerns.
Use a digital multimeter, a remote starter switch only where the service procedure permits it, and a scan tool on module-controlled vehicles. Avoid the old habit of shorting the battery stud to S with a screwdriver; it bypasses safety interlocks, produces an arc beside a high-current battery cable, and can move the vehicle unexpectedly.
No Click and No Crank
Check battery condition, battery-terminal tightness, starter fuses, relay power, park/neutral or clutch-switch status, and whether the S terminal receives a valid command. If S receives proper voltage under load but the solenoid remains silent and the ground path is good, the solenoid or starter assembly is suspect. If S receives no command, work backward through the control circuit rather than replacing the starter.
One Solid Click but No Crank
A single click means the solenoid is attempting to operate, but it does not prove the high-current path is healthy. Check battery voltage during the event, voltage drop across both battery cables, the solenoid contact path, motor connection, engine ground strap, and whether the engine rotates mechanically. A dedicated ground terminal on an insulated starter must also be present and secure.
Rapid Clicking
Rapid clicking usually occurs when voltage reaches the solenoid, drops sharply as the contacts close, then recovers when they open. Common causes include a discharged battery, loose battery terminals, excessive cable resistance, or a poor engine ground. Test under load before condemning the solenoid.
Starter Runs but Does Not Engage
If the motor spins without turning the engine, inspect the starter drive, pinion engagement, mounting alignment, flywheel or flexplate teeth, and application correctness. Enhanced systems with separate pinion-actuator control require model-specific diagnostics because the motor and engagement functions may not be commanded by the same relay.
Voltage-Drop Testing Chevrolet Starter Solenoid Wiring
Voltage-drop testing is more useful than checking resistance on an unloaded cable. Keep the meter leads across the section being tested while an assistant commands crank, then read how much voltage is being lost through that cable, connection, stud, switch, or ground path. Excessive loss identifies resistance even when the cable looks clean externally.
For Chevrolet starter solenoid wiring, test the positive and negative sides separately. Also compare battery voltage with voltage at the B stud during cranking and measure the S-terminal command under load; a control wire that shows battery voltage with the connector unplugged may fall too low when the solenoid coil is connected.
Positive-Side Test
When testing Chevrolet starter solenoid wiring, place the red meter lead on the battery-positive post—not the clamp—and the black lead on the solenoid B stud. Command crank and observe the reading. Then isolate smaller sections, such as post to clamp, clamp to cable, cable to ring terminal, and ring terminal to stud, until the largest loss is found.
Ground-Side Test
Place the red lead on the starter housing and the black lead on the battery-negative post while cranking. A high reading indicates resistance through the starter mounting surface, block, ground strap, cable, or battery connection. Testing housing-to-block and block-to-battery separately narrows the fault.
Common Chevrolet Starter Solenoid Wiring Mistakes
The most damaging errors happen because the terminals look similar or because a replacement starter is clocked differently. Never transfer wires by position alone. Use terminal markings, photographs, labels, replacement instructions, and the factory schematic.
Chevrolet starter solenoid wiring should also remain mechanically secure. A slightly loose high-current nut can create heat and arcing, while overtightening can rotate or crack the insulated terminal inside the solenoid. Delco Remy publishes different torque values for different starter families, which means a generic “tighten it hard” rule is unreliable.
- Putting the battery cable on the motor stud
- Moving an old R-terminal wire to S
- Leaving the engine-to-body or engine-to-battery ground strap disconnected
- Stacking a ring terminal where it can touch the starter housing
- Bypassing the neutral-safety or clutch switch
- Removing a factory IMS relay from a starter designed to use it
- Using an undersized cable or unsealed crimp near exhaust heat
- Reusing burnt, loose, or green-corroded terminals
- Assuming a new starter is automatically the correct application
- Applying battery voltage to an unidentified late-model control terminal
Wire Size and Protection for Chevrolet Starter Solenoid Wiring
The battery-to-starter cable carries high cranking current and must match the vehicle’s required conductor size, length, temperature rating, and terminal design. Longer cables need more copper cross-section to control voltage drop, while high-compression engines, cold climates, and trunk-mounted batteries increase demand. Do not size the main cable by copying the small S wire.
The S circuit is a control circuit, but it still needs the correct fuse or fusible protection, connector seal, and heat-resistant routing specified by the vehicle manufacturer. Keep all starter wiring away from exhaust manifolds, headers, steering shafts, suspension travel, sharp edges, and oil-soaked areas. Never add an unfused accessory feed to the starter stud merely because it has constant power.
Replacing Chevrolet Starter Solenoid Wiring Components
Before buying parts, identify the vehicle by year, model, engine, transmission, VIN, starter family, and terminal configuration. Compare tooth count, mounting pattern, nose design, rotation, solenoid clocking, ground style, connector type, and the presence of R, I, IMS, or over-crank protection. Delco Remy warns that application understanding is essential before selecting a replacement.
After installation, verify that the cable does not twist the insulated stud, the starter sits flush, the battery cable cannot contact ground, and all heat shields are reinstalled. Reconnect the battery, confirm normal crank operation, inspect for heat or arcing, and scan for diagnostic trouble codes on modern vehicles. If the starter remains engaged, disconnect power safely and recheck the S circuit and relay command immediately.
Frequently Asked Questions About Chevrolet Starter Solenoid Wiring
The correct answer to most Chevrolet starter solenoid wiring questions begins with the vehicle year and starter design. Chevrolet used several starter families and control strategies, so the terminal label and factory diagram always outrank wire color, physical position, or a diagram copied from another model.
These FAQs address the most common search questions while preserving that application-specific requirement. Before testing a late-model vehicle, consult service information for the exact VIN and check module data rather than bypassing the relay circuit.
Which Wire Goes to the S Terminal on a Chevy Starter?
The S terminal receives the crank-command wire from the ignition-switch or starter-relay circuit. On a classic system, it usually becomes live only with the key in START; on a modern system, a relay controlled by the ECM or related modules may supply it. Identify it by the wiring diagram and terminal marking, not color alone.
Where Does the Positive Battery Cable Connect?
The positive cable connects to the large B, BAT, or battery-positive stud on the solenoid. Other factory power-distribution leads may share that stud, but the motor strap belongs on the separate motor terminal. Delco Remy distinguishes the solenoid battery-positive and solenoid switch-positive connections in its terminal legend.
What Is the R Terminal on a Chevrolet Starter Solenoid?
The R terminal is an auxiliary terminal found on some older starter solenoids. Use it only when the original harness was connected there; Delco Remy explicitly instructs installers to reconnect an existing R wire to the replacement R terminal. Many later starter designs omit R and I terminals.
Why Does My Chevy Starter Click but Not Crank?
A click shows that some control current is reaching the solenoid, but the battery, battery cables, engine ground, solenoid contacts, motor connection, starter motor, or engine itself may still prevent cranking. Measure battery performance and voltage drop during the click, then verify that the motor stud receives power and the ground path remains intact.
Can I Bypass the Starter Relay or Jump the Solenoid?
Jumping a starter circuit can bypass park/neutral, clutch, theft, and module-controlled safety logic. It also creates an arc near a high-current connection and may cause the vehicle to move. Use the manufacturer’s diagnostic procedure, proper test equipment, and a remote switch only when the exact circuit and safety conditions are known.
Conclusion: Verify Before You Connect
Reliable Chevrolet starter solenoid wiring comes down to four disciplines: identify every terminal, preserve the original safety and control path, test the circuit under load, and use the exact diagram for the vehicle. In any Chevrolet starter solenoid wiring layout, the large B stud supplies battery power, the motor stud feeds the starter, S commands the solenoid, R is application-specific, and the ground path must carry the same cranking current as the positive cable.
Before changing Chevrolet starter solenoid wiring, record the VIN and starter part number, photograph the existing connections, obtain the correct factory schematic, and perform battery and voltage-drop tests before buying a solenoid or starter. That process takes longer than swapping wires at random, but it prevents damaged components, repeat failures, and the far more expensive mistake of replacing a good starter.